One of the questions that a lot of people ask about workflow 4 is how to integrate manual tasks into the workflow process so that humans can be involved and interact with the workflow process. After all, what use is a stateful, long running service if no humans are involved? All of the activities that ship with workflow 4 and many of the samples provided only really cover programmatic activities but what about user interaction, I mean WF4 does not even ship with an email activity.
The purpose of this post is to introduce the concept of a manual task into a workflow process and show how correlation can be used to help route service calls back to the originating workflow instance.
Scenario
The problem we will try to solve is that we have a textual statement that needs to be sent to a number of people (approvers) who must approve or decline, indicating their acceptance of the statement. Once all the approvers have completed their tasks a report of the number of approvals is sent to the requestor. We are going to use emails to send the manual tasks to our approvers. The emails will have “Approve” and “Decline” links in them, clicking these links will update the status of the task in the workflow.
The Workflow
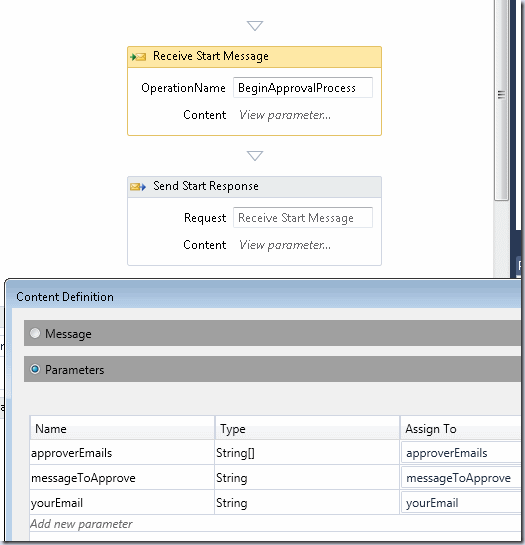
We start our workflow by creating a Workflow Service Library project and adding the parameters to our Receive activity to take the list of approver emails, the message which will be the statement that should be accepted or declined and the email of the requestor so that the report can be sent back to them. These parameters will be assigned to variables within our workflow.
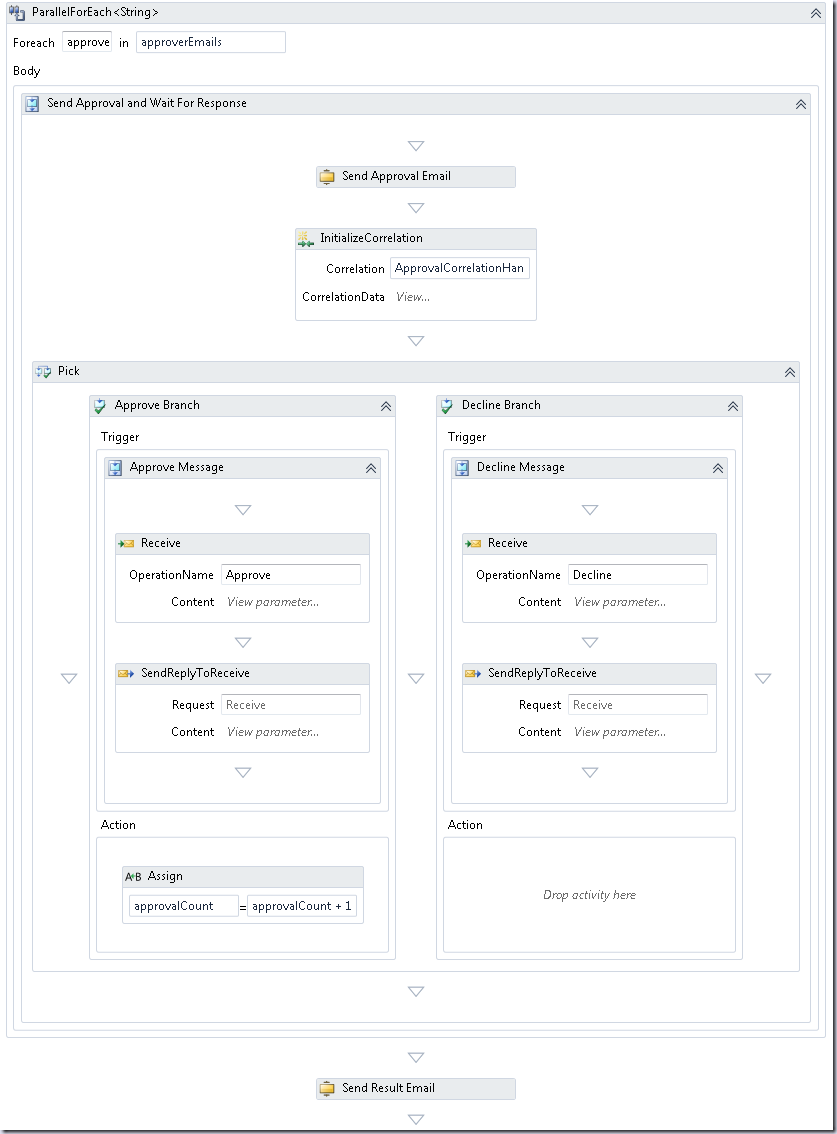
Next we have to process each of the approval emails and handle the corresponding responses. The rest of the workflow is shown below.
So lets walk through it.
ParallelForEach<string>
The first thing we need to consider is that we are going to process each of the approvals in parallel so that we are not dependent on the order of the responses. To do this we use a ParallelForEach<T> activity, this is essentially a parallel activity which will create a branch for each item in the source collection. The source collection in our case is the array of approver email addresses.
Send Approval and Wait for Response
This sequence will contain all our processing for a single approver branch. The most important things here which can’t be seen from the above image are the variables that belong to this sequence.
- approverId :This is a unique Guid initialised here to a new random guid. This will be used as a unique identifier for this approver.
- ApprovalCorrelationHandle: A correlation handle is a special type in workflow which holds information about how an incoming information can find our instance More on this later.
Send Approver Email
First we construct and send an email using a custom SendEmail activity included in the source. The implementation of this activity is not important, for our purposes all we care about is that it has four arguments, ToAddress, FromAddress, Subject and Body. The body contains an HTML message with Accept an Decline links to the web site we will create later.
"<html>" & _
"  <body>" & _
"    <p>Please approve or decline the following statement:</p>" & _
"    <h2>" & messageToApprove & "</h2>" & _
"    <a href=""http://localhost/TechEdNZ/Approval.Web/Approval/Approve/" & approverId.ToString() & """>Approve</a><br/>" & _
"    <a href=""http://localhost/TechEdNZ/Approval.Web/Approval/Decline/" & approverId.ToString() & """>Decline</a><br/>" & _
"  </body>" & _
"</html>"
As you can see it contains a bunch of not so pretty VB string concatenation. Not ideal but fit for our purposes.
InitializeCorrelation
The initialize correlation activity is used to setup our CorrelationHandle we declared earlier, We simply set the name of a correlation key “approverId” to the value of our guid variable “approverId.ToString()”. This means that we now have a correlation handle which can be used later on our Receive activity to allow the runtime to find this specific instance when the Receive endpoint is called with a compatible correlation parameter.
Pick
A pick is a very useful activity which basically says, perform each of my branches’ “trigger” sections in parallel and when the first one of them completes, cancel the other branched and run the completed branches’ “action” section. This is especially useful if you want to setup a number of Receive activities, essentially presenting a choice, and continue the workflow when a choice is made. In our case these triggers will be our Accept and Decline Receive activities.
Receive and SendReply
The two receive activities are simply operations on the same endpoint named “Accept” and “Decline”, they both have a single parameter called approverId which correlates to our unique guid via our CorrelationHandle, for more on how to setup correlation, see my previous post on the subject.
Assign
The assign simply increments an approval counter if the approver selected Approve
Send Result Email
The send result sends the approval count to the original requestor.
The Web App
Unfortunately, WF4 does not easily support REST as a communication mechanism for its Receive activities so we needed the links in our email to present a confirmation to the approver and at the same time call our workflow. This was most easily accomplished via an ASP.Net MVC2 web application with an ApprovalController as follows:
public class ApprovalController : Controller {

    public ActionResult Approve(string id) {
        ApprovalWorkflowService.ServiceClient serviceClient = new ApprovalWorkflowService.ServiceClient();
        serviceClient.Approve(id);
        return View();
    }

    public ActionResult Decline(string id) {
        ApprovalWorkflowService.ServiceClient serviceClient = new ApprovalWorkflowService.ServiceClient();
        serviceClient.Decline(id);
        return View();
    }

}
The RouteMapping in ASP.Net MVC will automatically turn our email link into the above method call which in turn will call our workflow with the appropriate approverId.
The Client
The client app here is just a console app with the following code:
ApprovalWorkflowService.ServiceClient client = new ApprovalWorkflowService.ServiceClient();
client.BeginApprovalProcess(new[] {
                                      "approver1@foo.com",
                                      "approver2@foo.com",
                                      "approver3@foo.com"
                                  },
                                  "Holiday approval for Joe Bloggs from 2nd December to 12th January?",
                                  "joe.bloggs@foo.com");
Summary
And that’s about it. Correlation comes to the rescue enabling us to send the 3 emails to the above addresses and, when they all click the links in their emails, the MVC app sends a message to our workflow definition. That message is routed to the correct workflow instance because the Receive activity told the runtime to wait for a call to “Accept” with one of 3 approver ids and to route that call to our instance. After they have all responded the workflow will continue past the ParallelForEach and the result is sent.
This application is fully compliant with pretty much any platform that has email and a browser and that’s as as simple as it gets.
What Next
This is just the beginning of how manual tasks can work in workflow. You could start to expand on this concept by mapping more data into your emails so that the approver is doing something more useful. Another option is to implement a threshold using a simple “If” so that e.g. 2 out of 3 approvers must approve and the workflow could subsequently decide whether to make a call to an HR service or something similar.
I hope you found this post helpful, code below.


